This was an asignment for robotic fabrication, aiming to design an sort of arduino tool and understand how arduino works. Studying the assignment I discovered a very interested topic which is obstacle detection and measurement. I studied a low-cost way to realize that and I think it's worth to share it.
Objective
The general objective of this assignment is to design an end-effector for robotic arm which automatically detects obstacles and adjust robot’s trajectory to avoid collision.
Normally, a robotic arm doesn’t have the ability to sense the environment or react to specific disturbance, which in most of the fabrication scenarios is reasonable because of comparatively uncomplicated building model and predictable movement of the robotic arm. However, with the high demand of more and more complicated fabrication scenario, to verify if the robotic arm is in collision with existing building structure beforehand is very time consuming or even impossible. And even though, there are still a lot of unpredictable accidents occurring -- leading a break to whole fabrication process. The pre-computation methodology tends to be insufficient to meet an advanced fabrication circumstance.
Therefore, it is essential to equip robotic arm with an end-effector, which can autonomously detect the building structure in space and try adjusting the trajectory of robotic arm to avoid building structure without external instruction. In this sense, we don’t need to consider conflicts between structure and robotic arm, and can focus more on the structure itself.
Specification
The mainstream of obstacle avoidance, as far as I am concerned, prefers using SLAM techniques to perceive environment, which requires high calculation abilities from hardware(RAM) and also often high end operation system (such as ROS). Whereas in this assignment, I would like to experience more arduino-ish hardware and software setups (arduino code in arduino board) and also get familiar with different communication protocols.
Detection Concept
The end-effector should be able to detect the obstacle nearby, calculate the distance and also detect the shape & size of the obstacle.
According to a paper, Obstacle Detection and Object Size Measurement for Autonomous Mobile Robot using Sensor (Fayaz Shahdib, 2013), a low cost way both in terms of economics and computations is to adopt sensor fusion technique, which uses the range data collected by the ultrasonic sensor with the image captured by the camera for object detection and object size measurement.
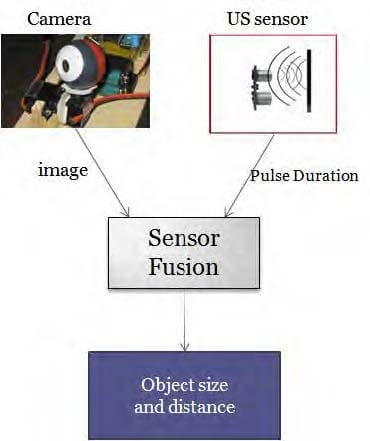
Human eye have a fixed angle of vision i.e. the lateral range of area, covered by the eye is limited to a fixed angle. The same is true for the camera. The field of view for a camera is also fixed. Everything the camera sees is squeezed into the image. Although the image has a fixed resolution, the size of an object in the image varies with respect to distance from the camera as well as with respect to the size of the object itself in real life. If the object is placed at two different distances from the camera in two different images, the appearance of the object in the image, where the distance between the object and the camera is less, is larger. If there are two objects of different sizes at the same distance, in the image it would appear that the larger object seems larger in the image. This geometric similarity is used to find the size of an object.
-- Obstacle Detection and Object Size Measurement for Autonomous Mobile Robot using Sensor (Fayaz Shahdib, 2013)
1.Object Detection Using Ultrasonic Sensor
Use ultrasonic sensor we can directly get distance from end-effector to the obstacle. But due to the mechanism of ultrasonic sensor, it works only if the obstacle is in front of the sensor and the obstacle should be big enough to detect. Also, the sensor only returns with the closest point it detects in the space, which causes inevitable errors for camera calculation.
2.Object Size Measurement Using Camera
A camera has a fixed vision and image size, from which we can deduce the size of the obstacle. Firstly the image from camera is processed to extract the obstacle from background. Secondly we take the distance from ultrasonic sensor to calculate the size of the obstacle based on geometrical similarity.
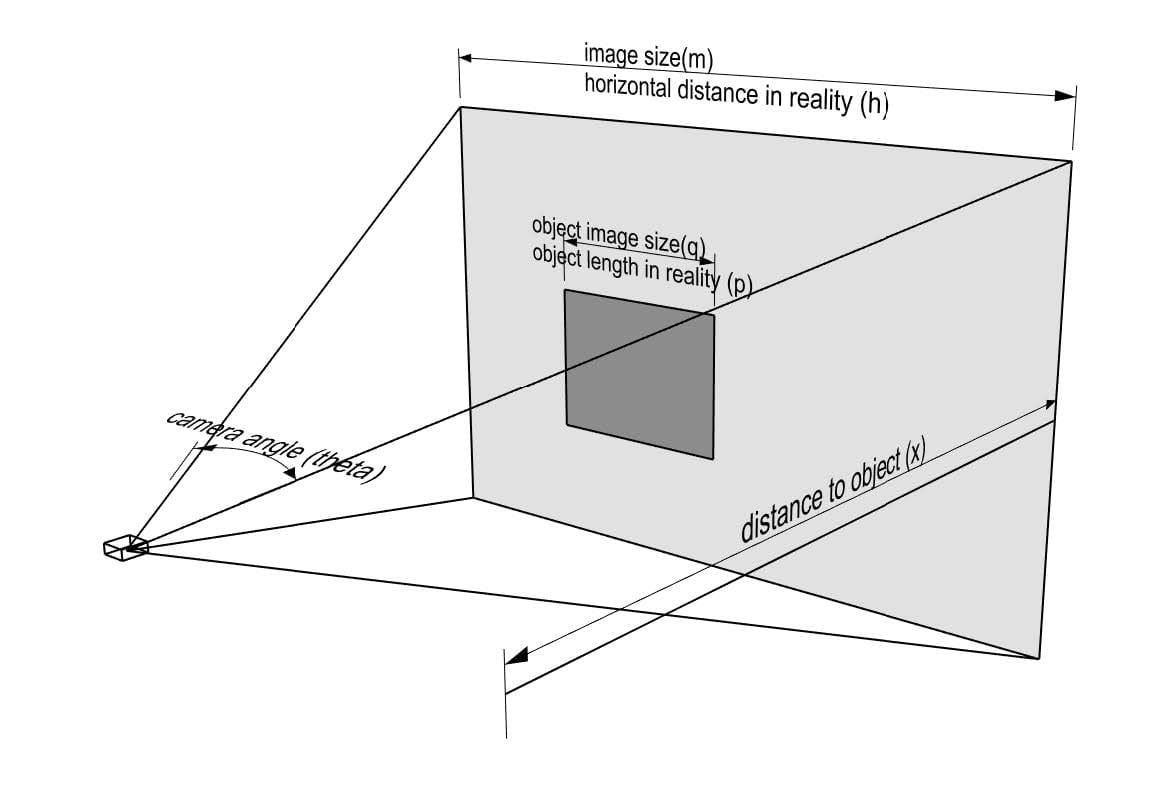
h = 2 _ X _ tan(θ/2)
q / m = p / h
==> p = h * q / m
==> p = 2*x _ tan(θ/2) _ q / m
==> if SCALE = 2 * tan(θ/2) / m
==> p = SCALE *x * q
Hardware Choose
Based on the theory above, I chose the sensor as shown below:
1.Ultrasonic Sensor HC-SR04
Working Voltage: DC 5V Connection: TTL(Digital Output/Input)
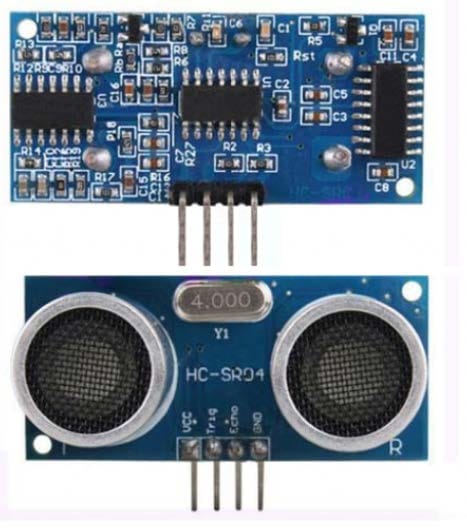
Ultrasonic ranging module HC-SR04 provides 2cm to 400cm non-contact measurement function, the ranging accuracy can reach to 3mm. The module includes control circuit, ultrasonic transmitters and receiver.
The basic principle of work:
a- Using Input output trigger for at least 10Micro seconds high level signal
b- The Module automatically sends eight 40 Khz and detect whether there is a pulse signal back.
c- If the signal back, through high level , time of high output Input output duration is the time from sending ultrasonic to returning.
-- manufacturer (http://www.micropik.com/)
2.TTL Serial Jpeg Camera 640 X 480 (Adafruit)
Working Voltage: DC 5V, communication 3.3 V Connection: TTL( TX / RX)
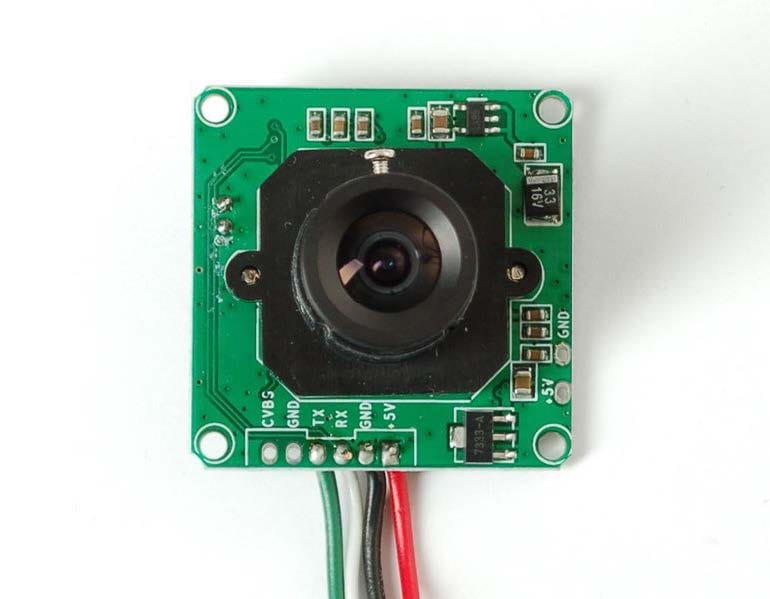
This camera module can be a pretty neat project addition. It was designed to be used in security systems and does two main things - it outputs NTSC video and can take snapshots of that video (in color) and transmit them over the TTL serial link. It has manually adjustable focus, auto-white-balance, auto-brightness and auto-contrast taken care of for you as well as motion detection built in.
Frame speed: 640480 30fps
Module size: 32mm x 32mm
Image sensor: CMOS 1/4 inch
CMOS Pixels: 30M
Pixel size: 5.6um5.6um
Output format: Standard JPEG
White balance: Automatic
Exposure: Automatic
Gain: Automatic
Shutter: Electronic rolling shutter
-- adafruit (https://www.adafruit.com/products/397)
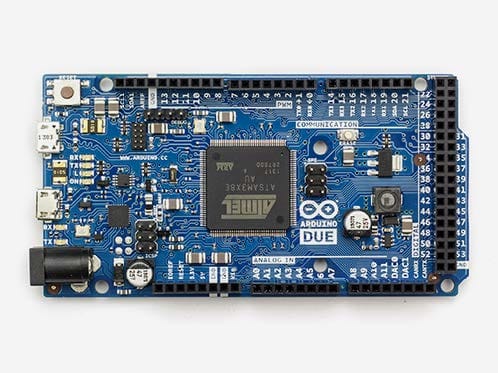
3.Arduino Due
Arduino Uno is cheap and good enough to deal with normal usage. But I have two concerns that leads me to choose Arduino Due. Firstly, the Arduino Uno doesn’t have enough serial ports(only one pair of serial port, which by default is used by USB port that we need to communicate with PC). Secondly, Arduino Uno only has flash memory of 32 K, which might be not enough to process images. So Arduino Due, which has 4 serial ports, and 512 K flash memory should be enough for all the calculations.
A 32-bit core
54 Digital Pins
4 Serial ports
CPU Clock at 84Mhz.
96 KBytes of SRAM.
512 KBytes of Flash memory for code.
-- https://www.arduino.cc/
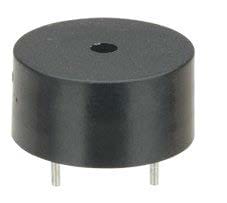
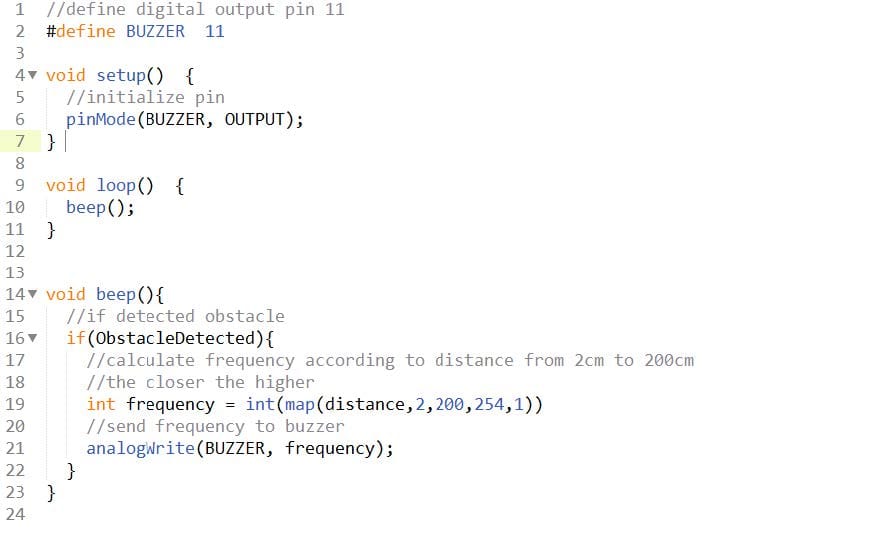
4.Buzzer(Optional)
Working Voltage: DC 1.5 ~ 15 V Connection: TTL( Digital Output(PMW)) A buzzer just beeps when the end-effector detects objects. And it’s frequency is higher when the distanceis smaller, working as a warning to human. It’s not necessary but helpful.
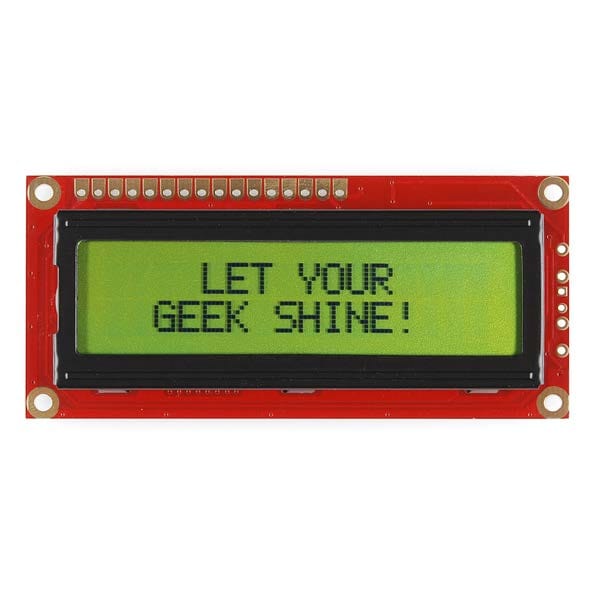
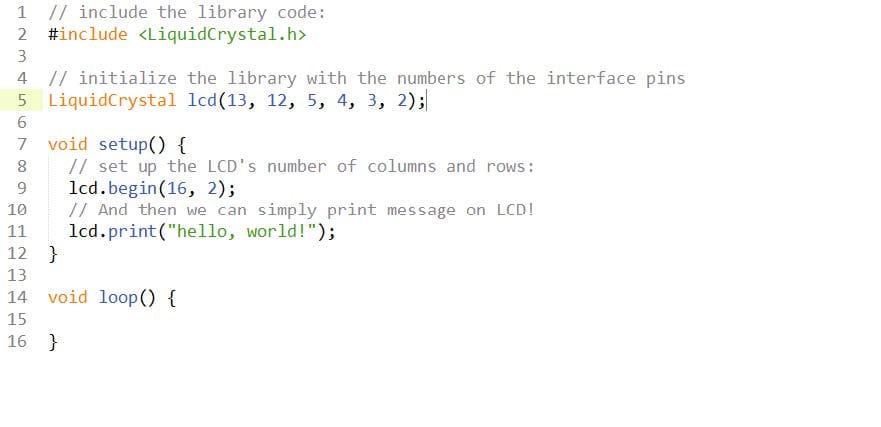
5.Sparkfun Basic 16x2 Character LCD (Just for Fun)
Working Voltage: DC 5 V Connection: TTL( Digital Output(PMW)) This LCD is just to show additional message to human, printing basic information such as distances, instructions like “start”,”stop”,”obstacle detected”,”changing trajectory” etc. Having this just makes the end-effector more humanlike, but it also doesn’t harm to remove it.
Assembly
Hardware List
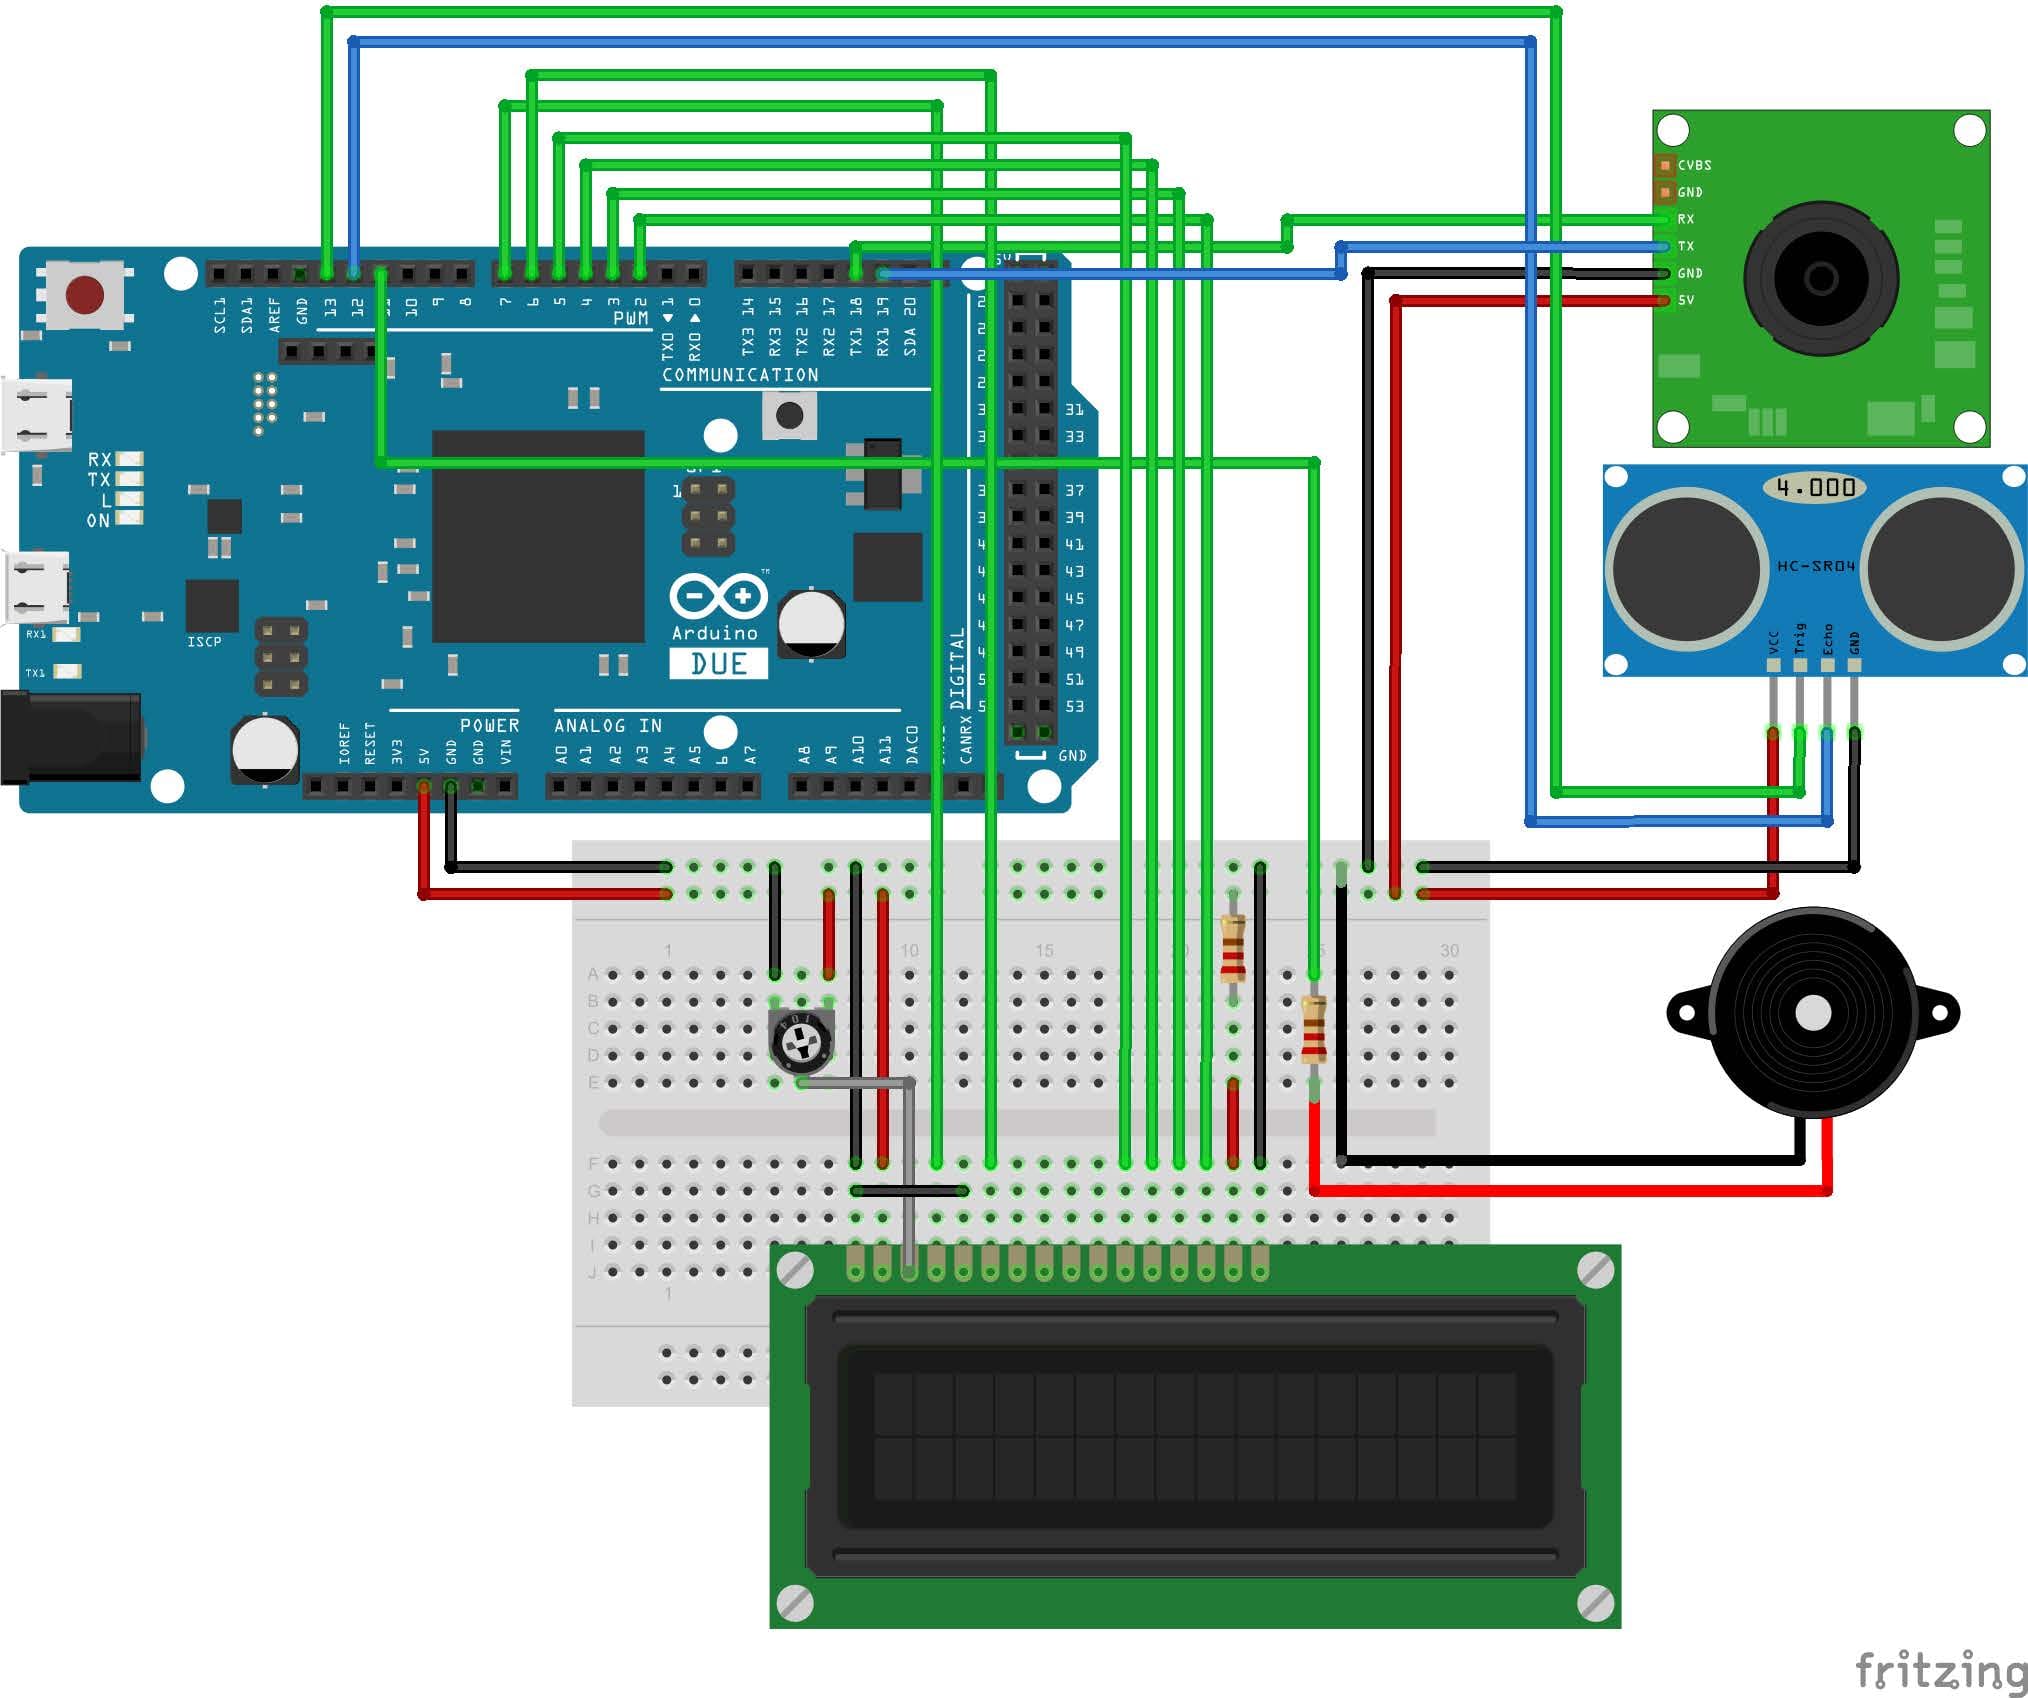
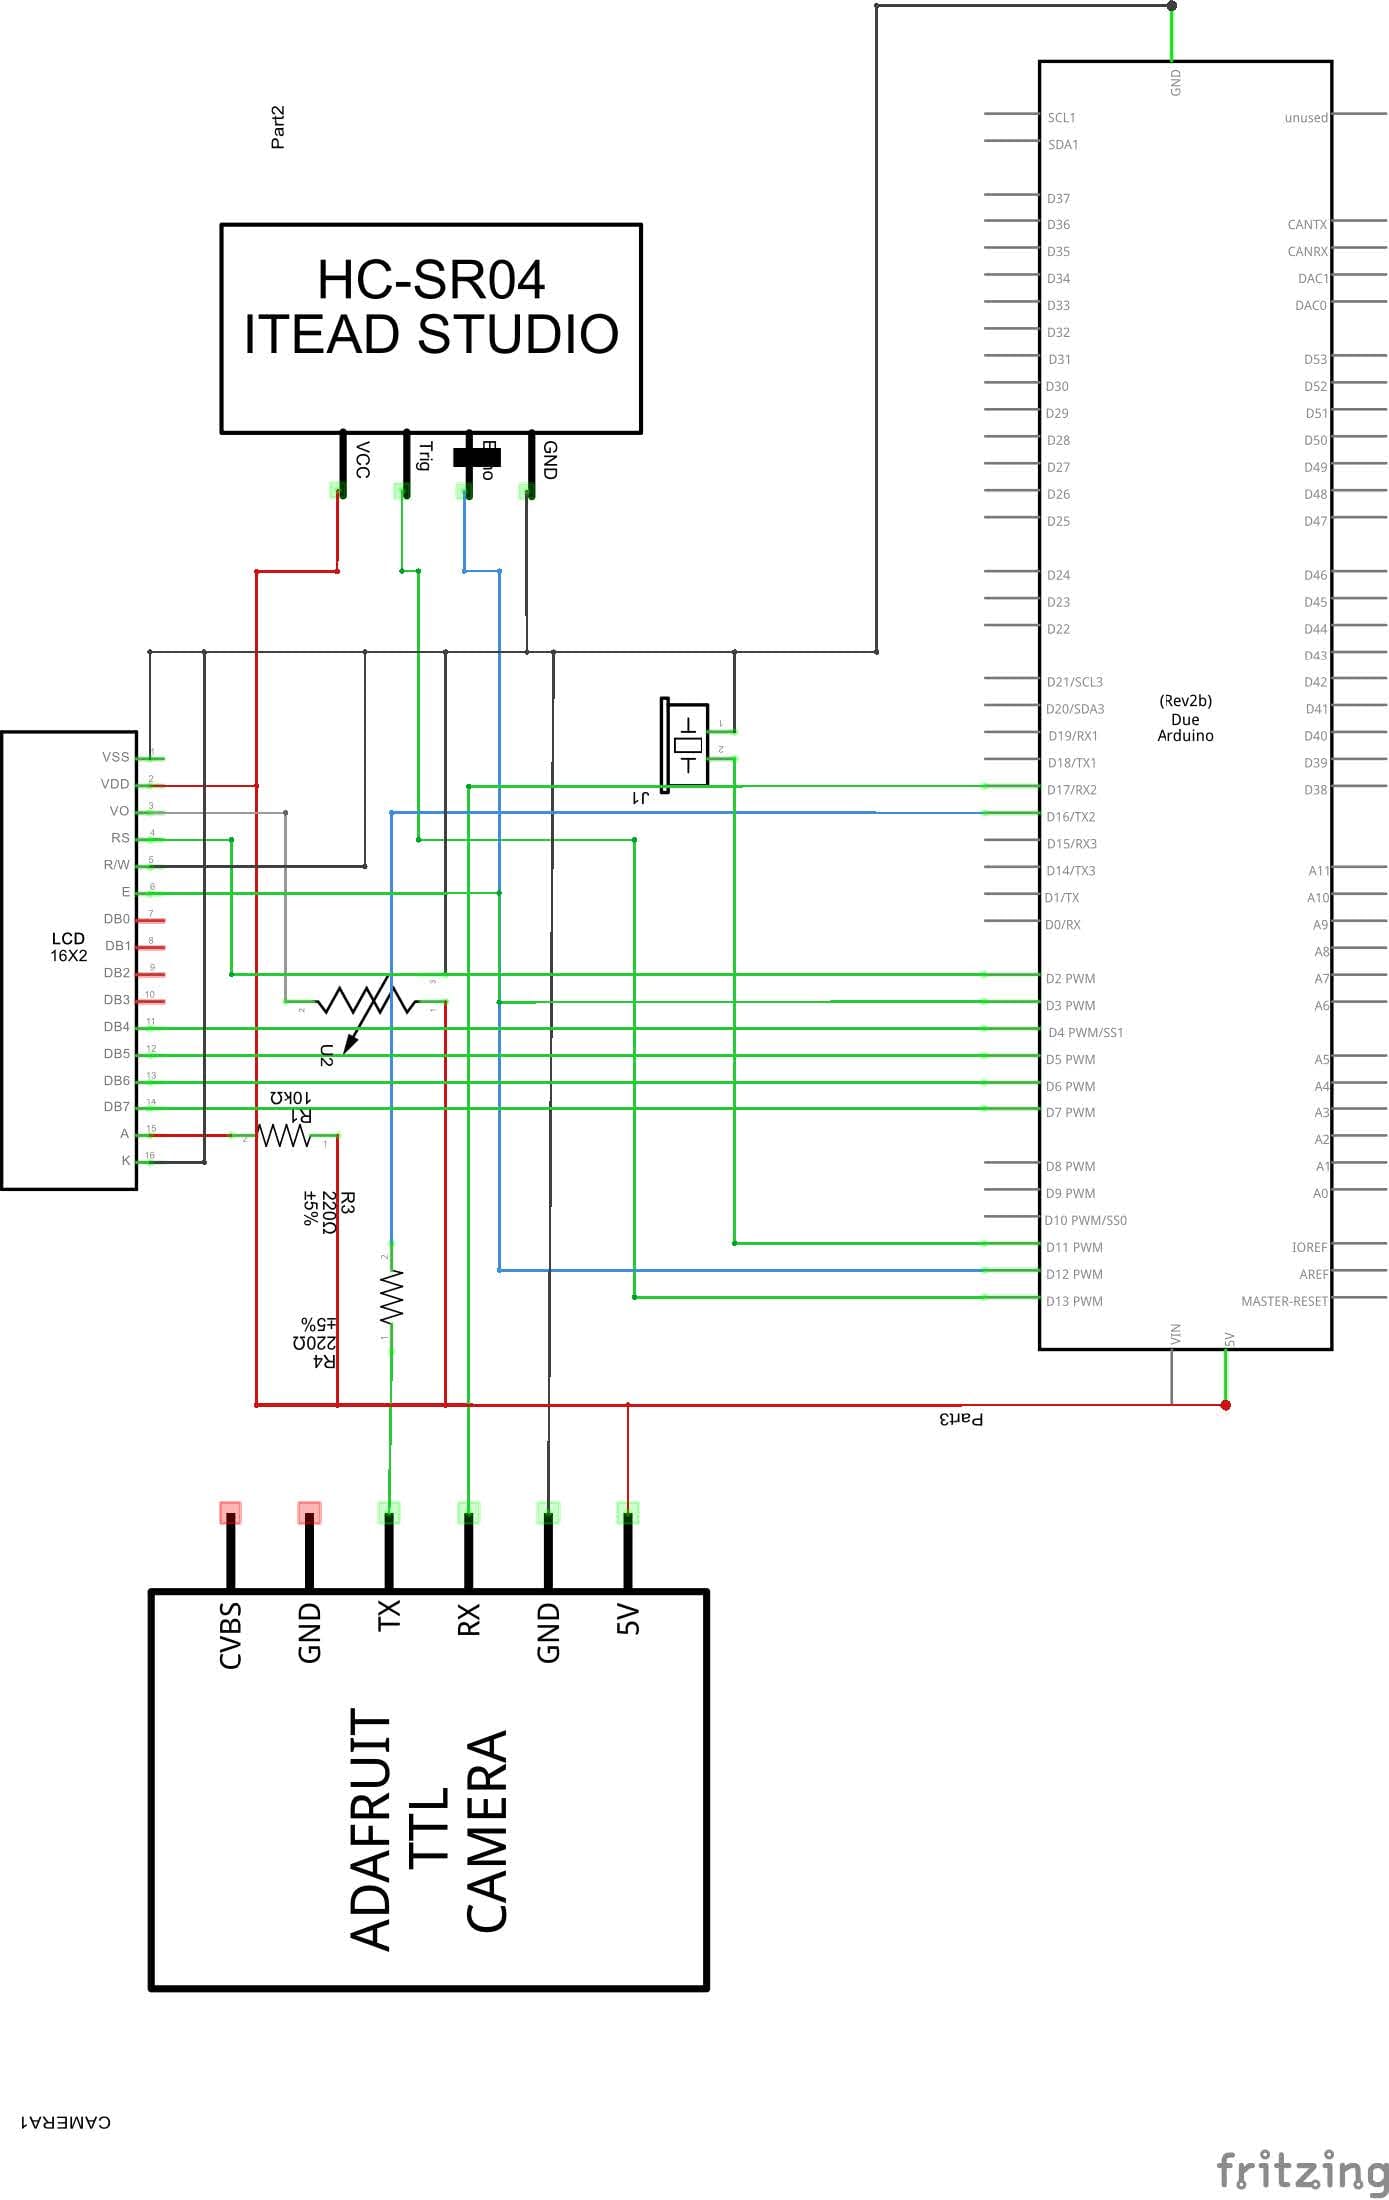
| Amount | Part Type | Properties | | ------ | -------------------------------- | --------------------------------- | | 1 | TTL Serial JPEG Camera 640 x 480 | | | 1 | Piezo Speaker | | | 1 | Arduino Due | (Rev2b) type Arduino Due | | 1 | Trimmer Potentiometer | maximum resistance 10kΩ | | 2 | 220Ω Resistor | tolerance ±5%; resistance 220Ω | | 1 | LCD-16X2 | package lcd-16x2; characters 16x2 | | 1 | BreadBoard(small) | |
Module Explaination and Coding
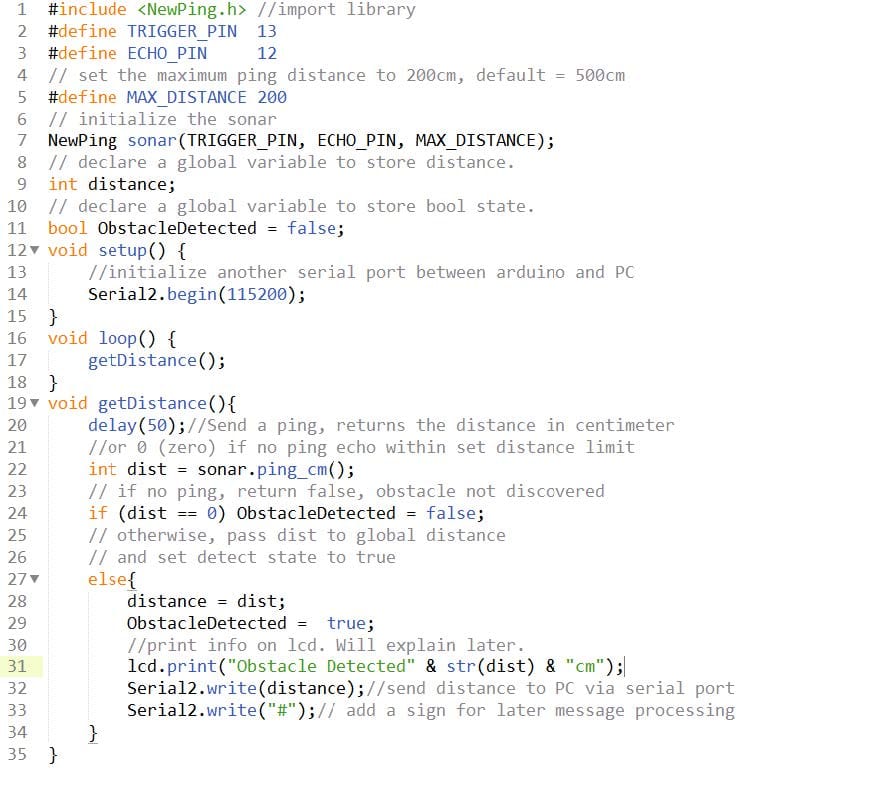
1. Ultrasonic Sensor HC-SR04
This sensor has 4 ends, VCC and GND connect to Arduino Due VCC and GND respectively. Trig connects to Due pin 13 (set output) and Echo connects to Due pin 12(set input).
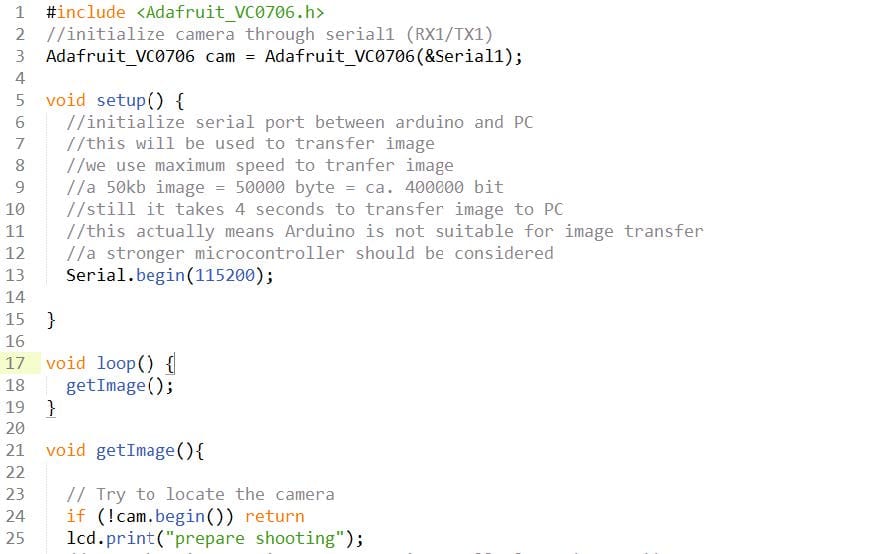
2.TTL Serial Jpeg Camera 640 X 480 (Adafruit)
This sensor has 6 ends, the CVBS and GND ends can connect to a TV or monitor(which we don’t need). And the other 4 ends, VCC and GND connect to Arduino Due VCC and GND respectively. RX connects to Due TX1 and TX connects to Due RX1. (Because the RX0 and TX0 are occupied by USB by default) RX and TX need to work under 3.3V, and Arduino Due offers exactly 3.3V for RX/TX ports, so we don’t need extra resistor.
3.Buzzer
This sensor has two ends. The GND connects to Arduino GND, and VCC connects to Arduino Pin 11(Digital output(PMW)).
4.Sparkfun Basic 16x2 Character LCD
This sensor has a lot of ends. Simply follow instructions from Arduino Official Webpage and the library they offered, we can directly use it.
- LCD RS pin to digital pin 13
- LCD Enable pin to digital pin 12
- LCD D4 pin to digital pin 5
- LCD D5 pin to digital pin 4
- LCD D6 pin to digital pin 3
- LCD D7 pin to digital pin 2
4.Arduino to PC
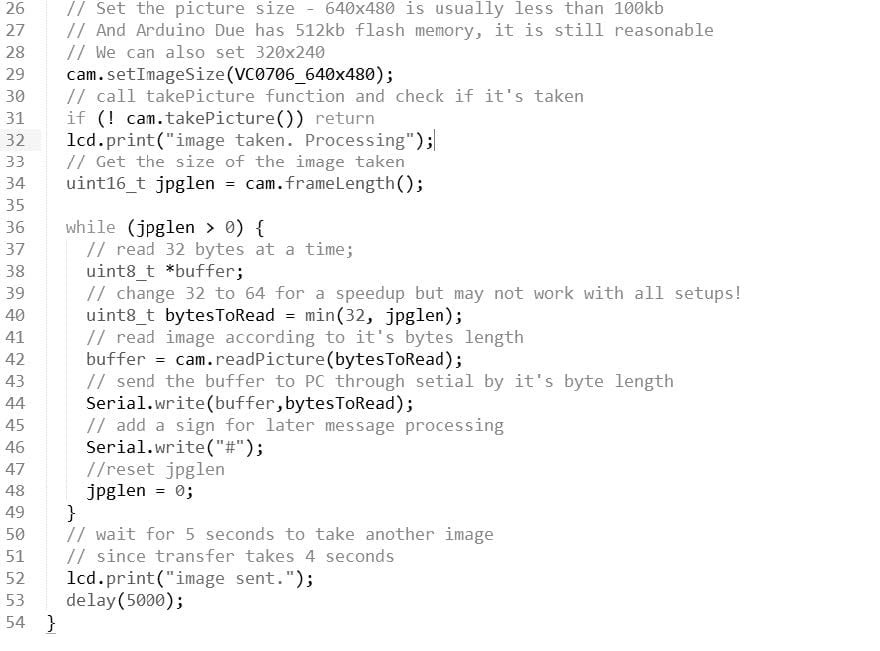
Now it’s time to receive those messages on PC. Currently arduino board has two connections to PC: first one is arduino USB(also can be thought as RX0/TX0) to PC USB, which we use to transfer image(Using serial.write); the other one is RX2/TX2 to PC USB, which we use to transfer “distance”(serial2.write). ( As far as I understand it is very difficult to split and recognize messages if we send both string ”distance” and image through a single serial connection, so it’s easier to just use two serial ports separately. And now I even regret to use even arduino to transfer image through serial, because the image has to be “decompiled” to bits and then send to PC to “compile” them again into image. But for now I assume it’s not difficult to do so.)
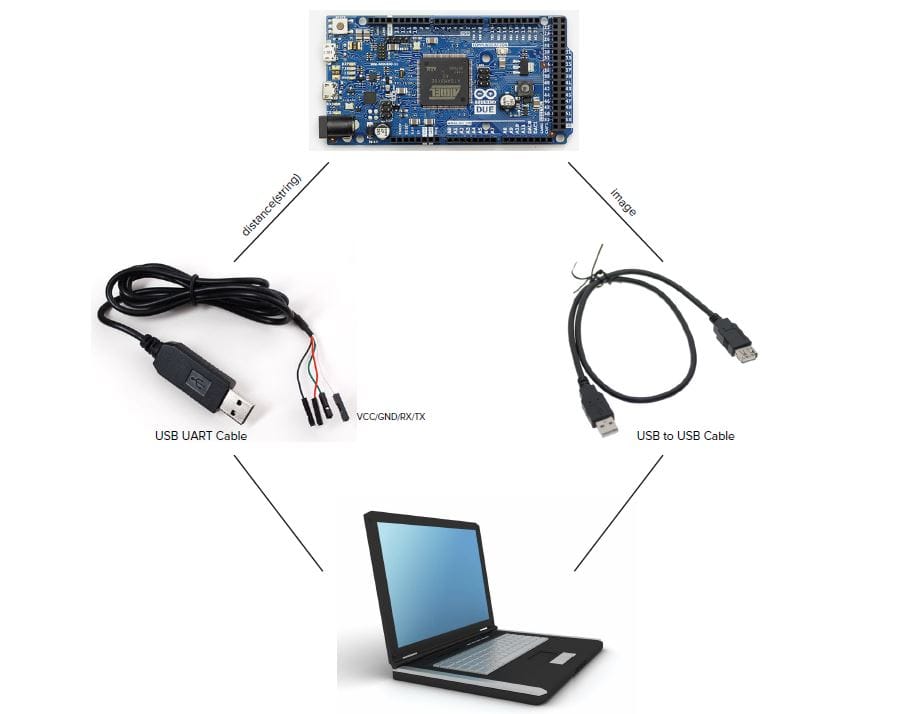
I use Processing to process the messages since it it more compatible with arduino and has more libraries.
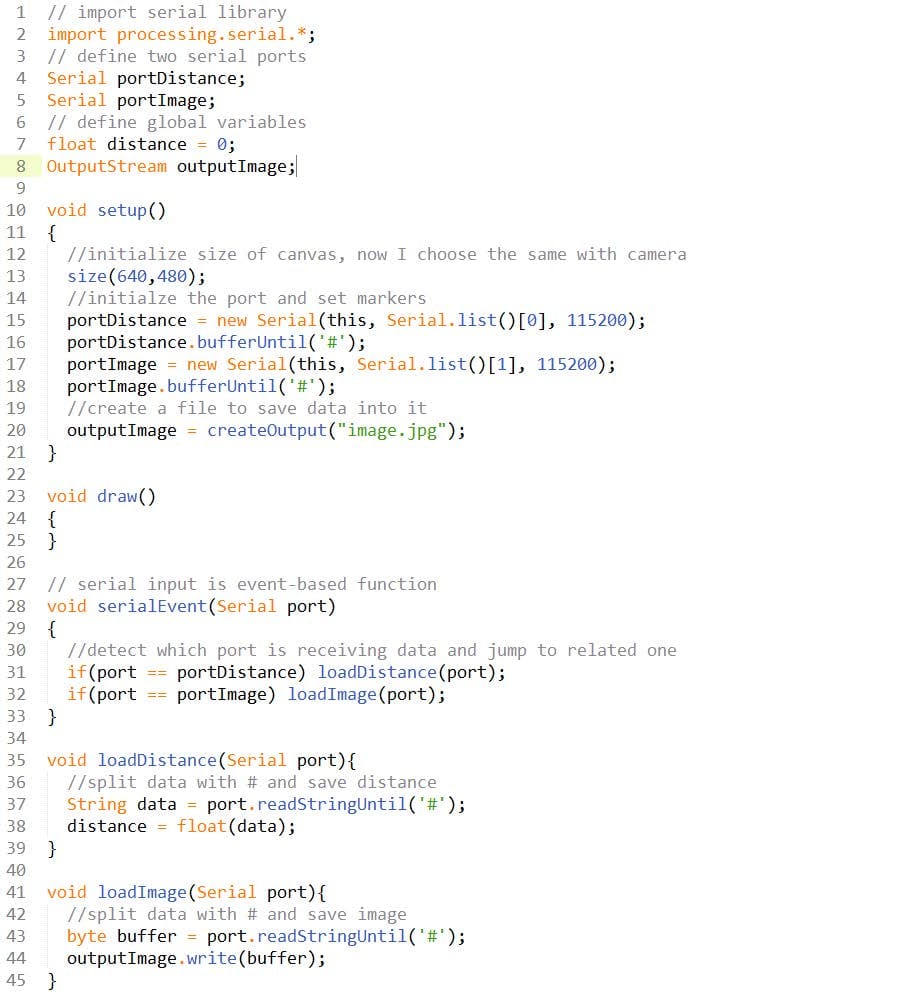
Image Process and Calculation
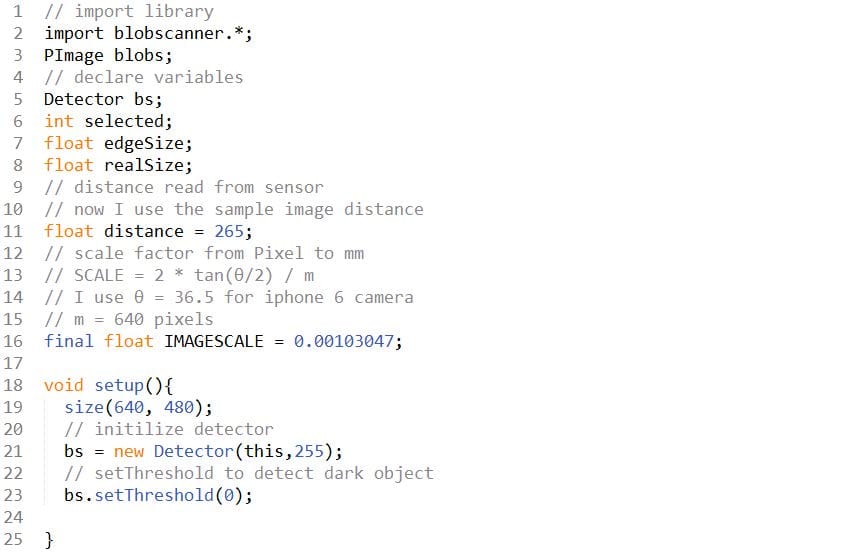
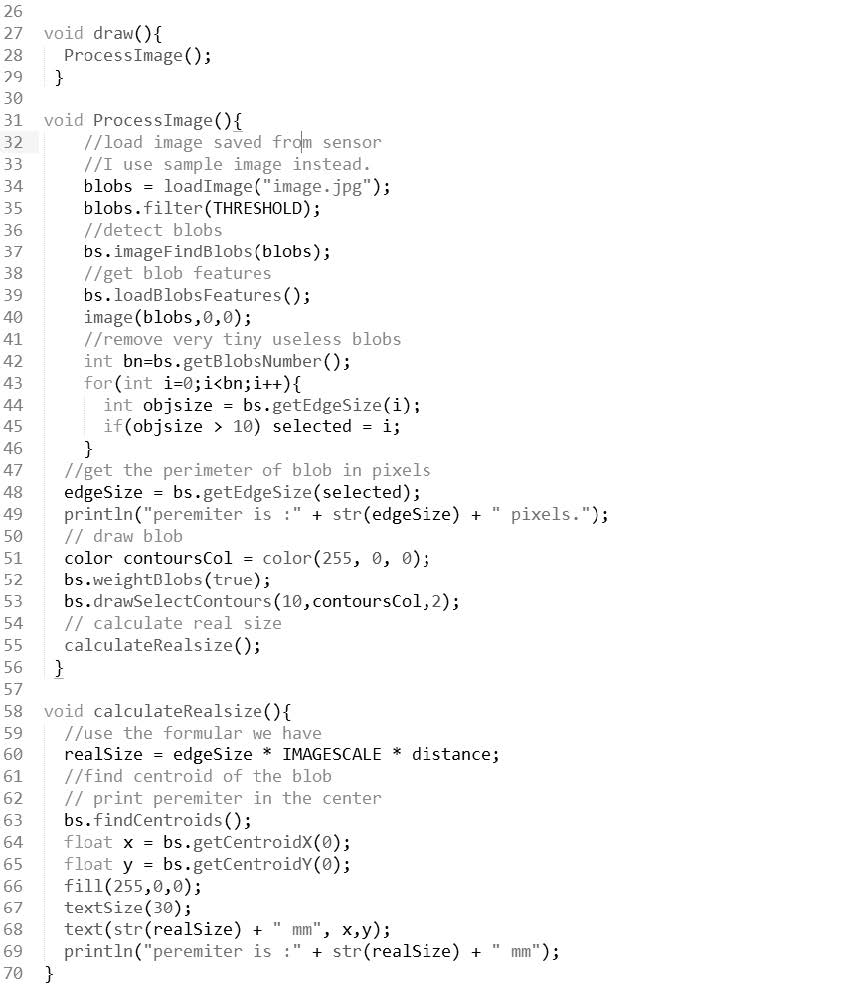
For the image process I choose a library from Processing called “BlobDetection”. This library can let you set threshold of detection, return detected objects as list and also return width and height of the object in pixels.
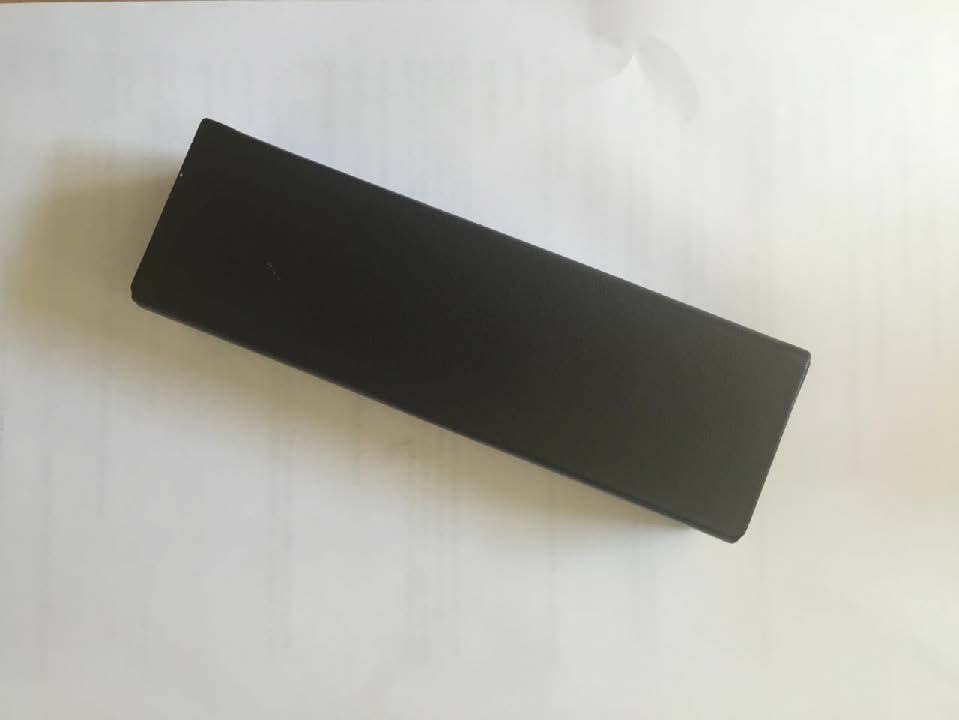
And to try it out I took a image from my iphone for processing to work. The image is taken from distance = 265 mm away from iphone. And the angle of view of iphone 6 isight camera is 36.5 degree. So we can calculate the scalefactor = 2 * tan(θ/2) / m = 2 * tan (36.5/2) / 640 = 0.00103047.
Iphone 6 iSight Camera:
35mm lens = ca. 36.5 degree
distance = 265 mm
scalefactor = 0.00103047
realsize = 16 cm by 5 cm
perimeter = 420 mm
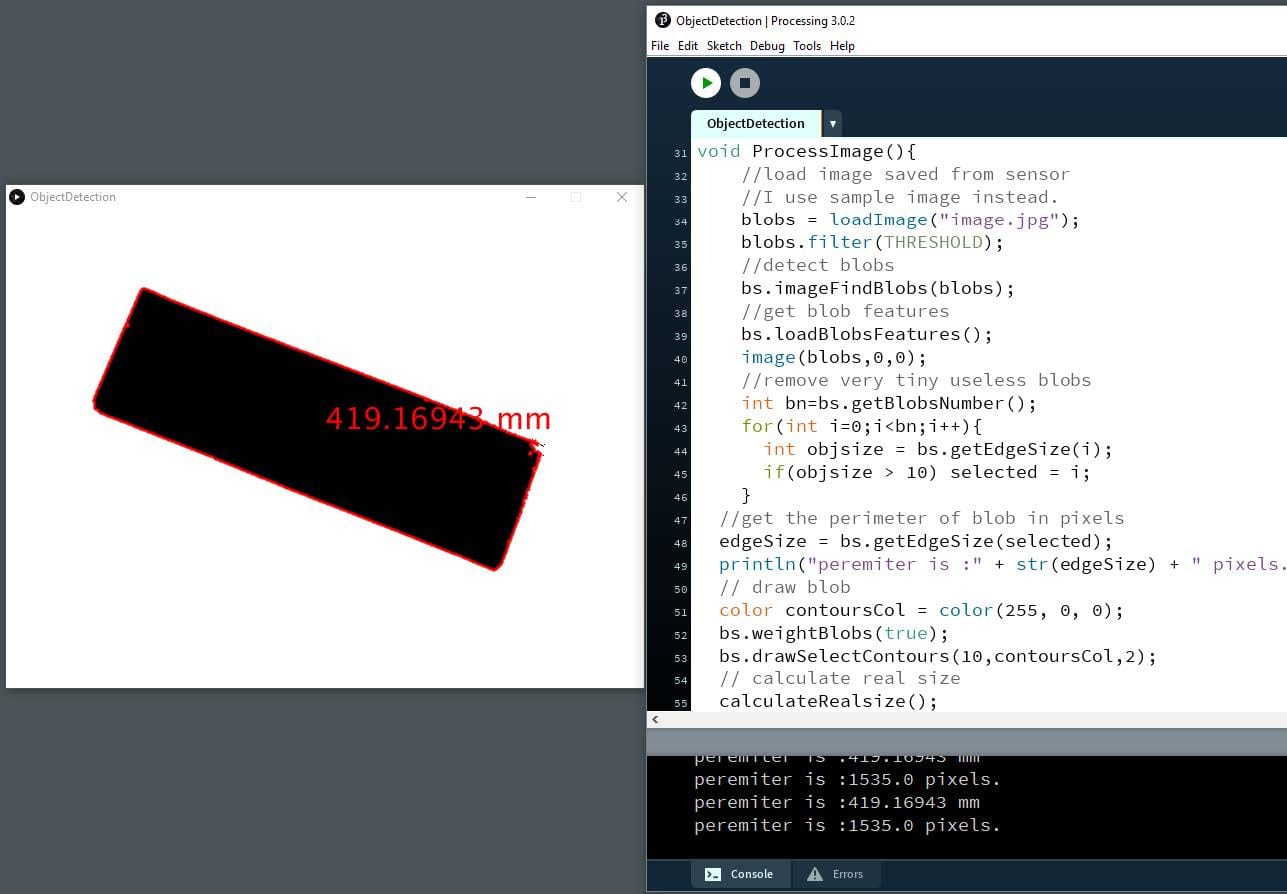
The result is showing that the calculation is precise enough (420mm in real size, 419mm calculated). But it is a very ideal situation(only one big object in view, good quality image, predefined distance and image). Nevertheless, it is possible to detect the object and calculate the size of the object theoretically.
Next Step
Going back to the concept, the end-effector detects the obstacle on its way to initial destination and changes the trajectory. This can be illustrated by three steps below:
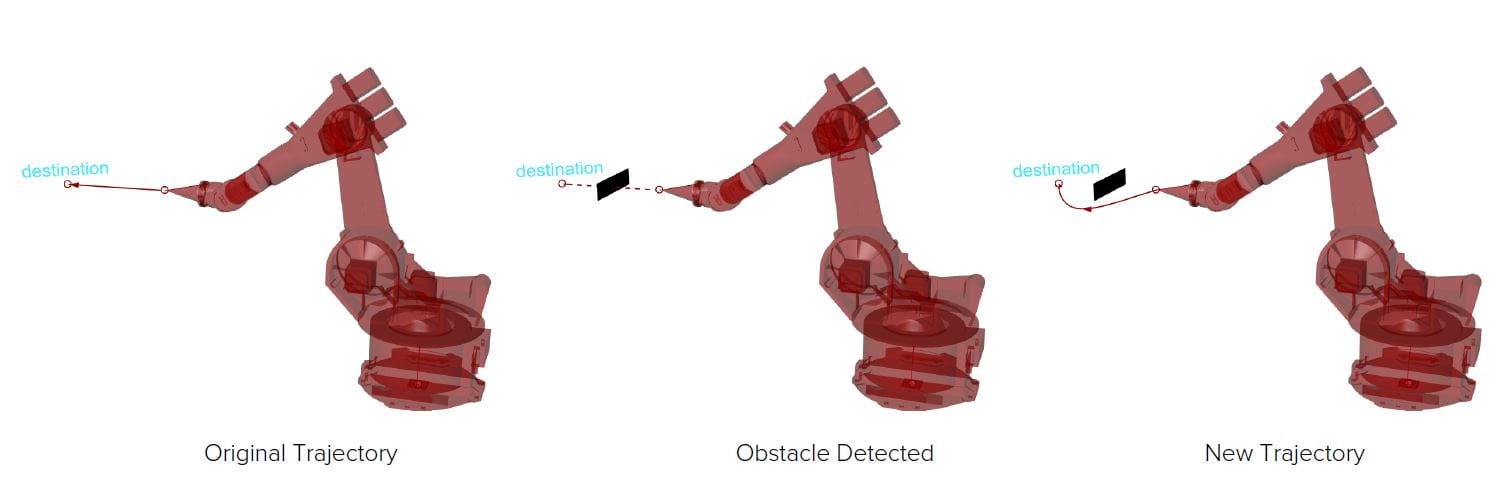
According to distance and size of the obstacle, its position on the image, and the end-effector TCP, we can actually calculate the position of obstacle in world coordinate. So we can have current position of our end-effector, position of destination, and position & size of obstacle, the information is pretty enough to help find a new trajectory which avoids the obstacle.
Next step I would adopt agent-based model and generic algorithm to find an optimal trajectory, which I would try as upcoming Advanced Behavior Seminar assignment, to fulfil the entire process.
Conclusion
The result of image processing turns good, but in reality I consider the ultrasonic sensor can not feedback with an ideal distance since obstacle is not always in front of the sensor. Also the situation of image detection would be more complicated due to difficult object extraction. These all need to be tried out to see how it works.
Arduino offers a very big range of choices in the field of both hardware and software, which is good because of its high customization, but on the other hand confusing against a proper choice. In my case, I feel the choice of using Odriod and Linux would be much easier due to its powerful hardware and rich resources in software. Then we can handle the information and calculation all within Odriod, also a lot of mature libraries will be available on Linux.